In today's digital world, balancing user privacy with the need for analytics insights is crucial. In this article we will review how to set up Google Analytics consent using Klaro and Google Tag Manager. Klaro provides an elegant and easy-to-use cookie management interface for users, and is a smart way for website owners to respect user preferences while still understanding their audience. By combining Klaro's consent management features with the flexibility of Google Tag Manager, you can give visitors control over their data while staying compliant with privacy regulations.
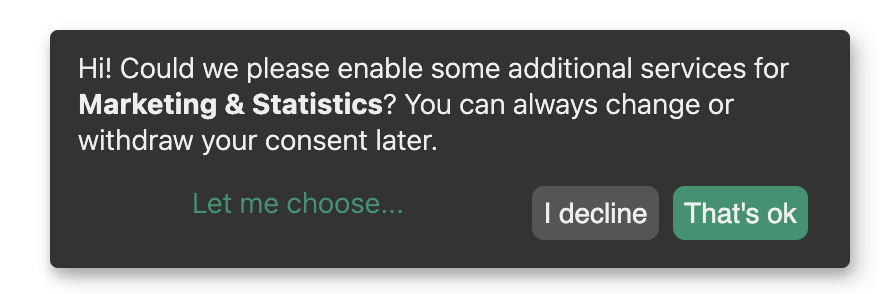
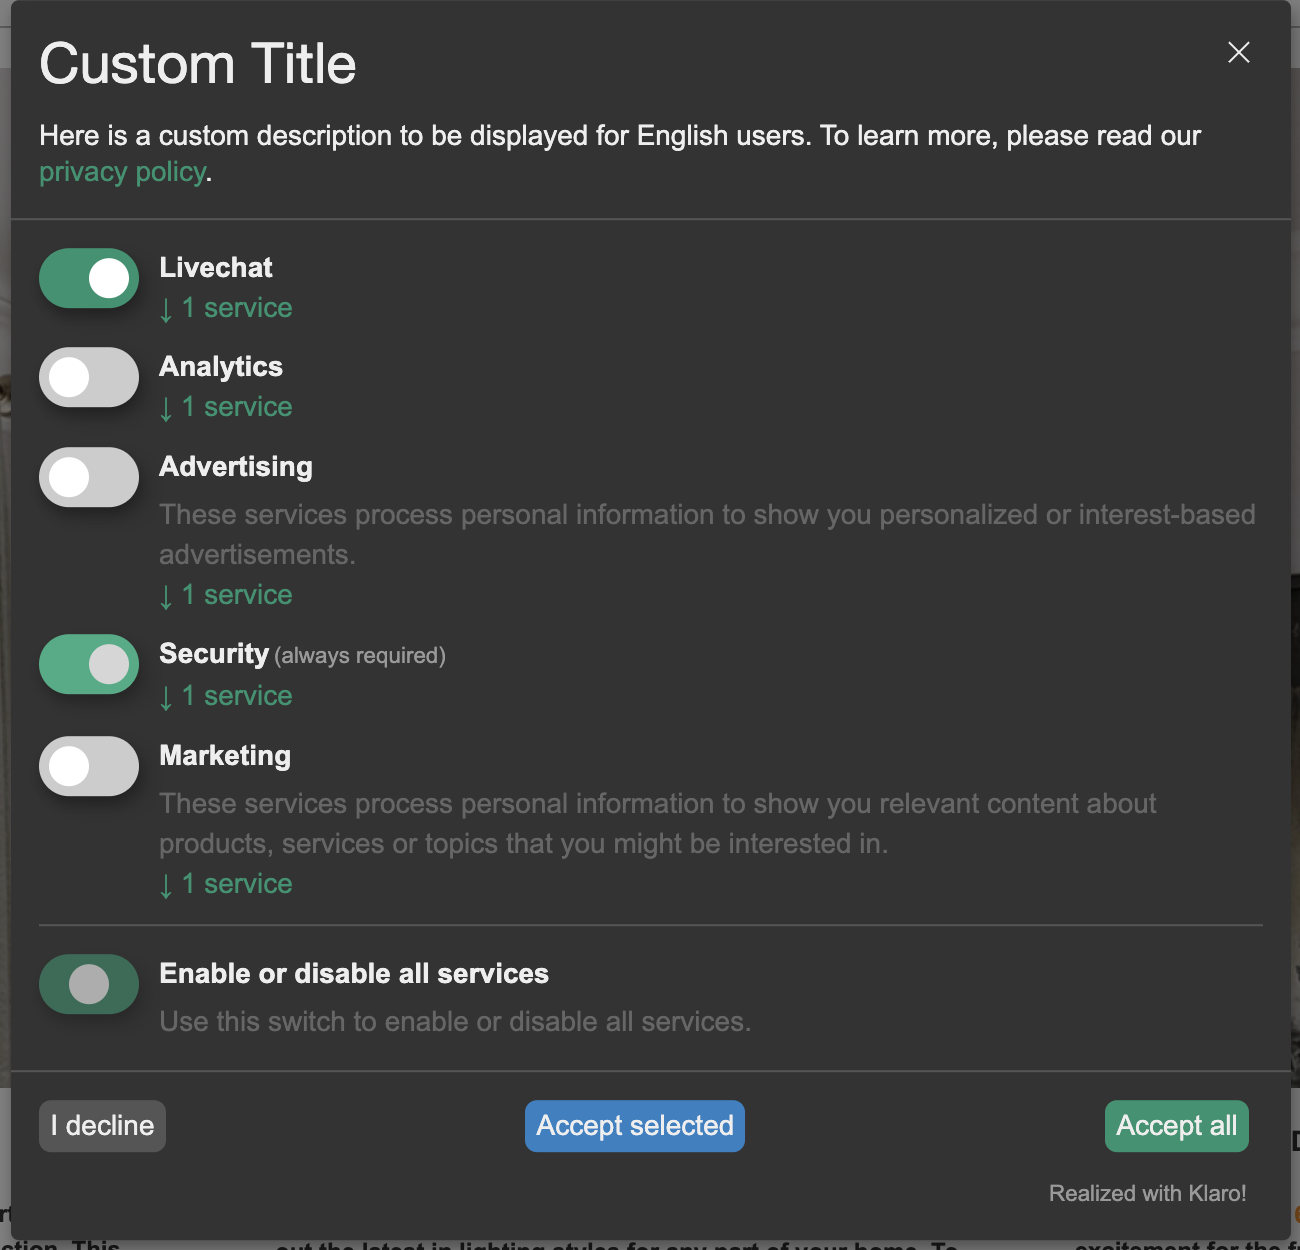
Here is an example of the initial cookie consent box that users will be provided:
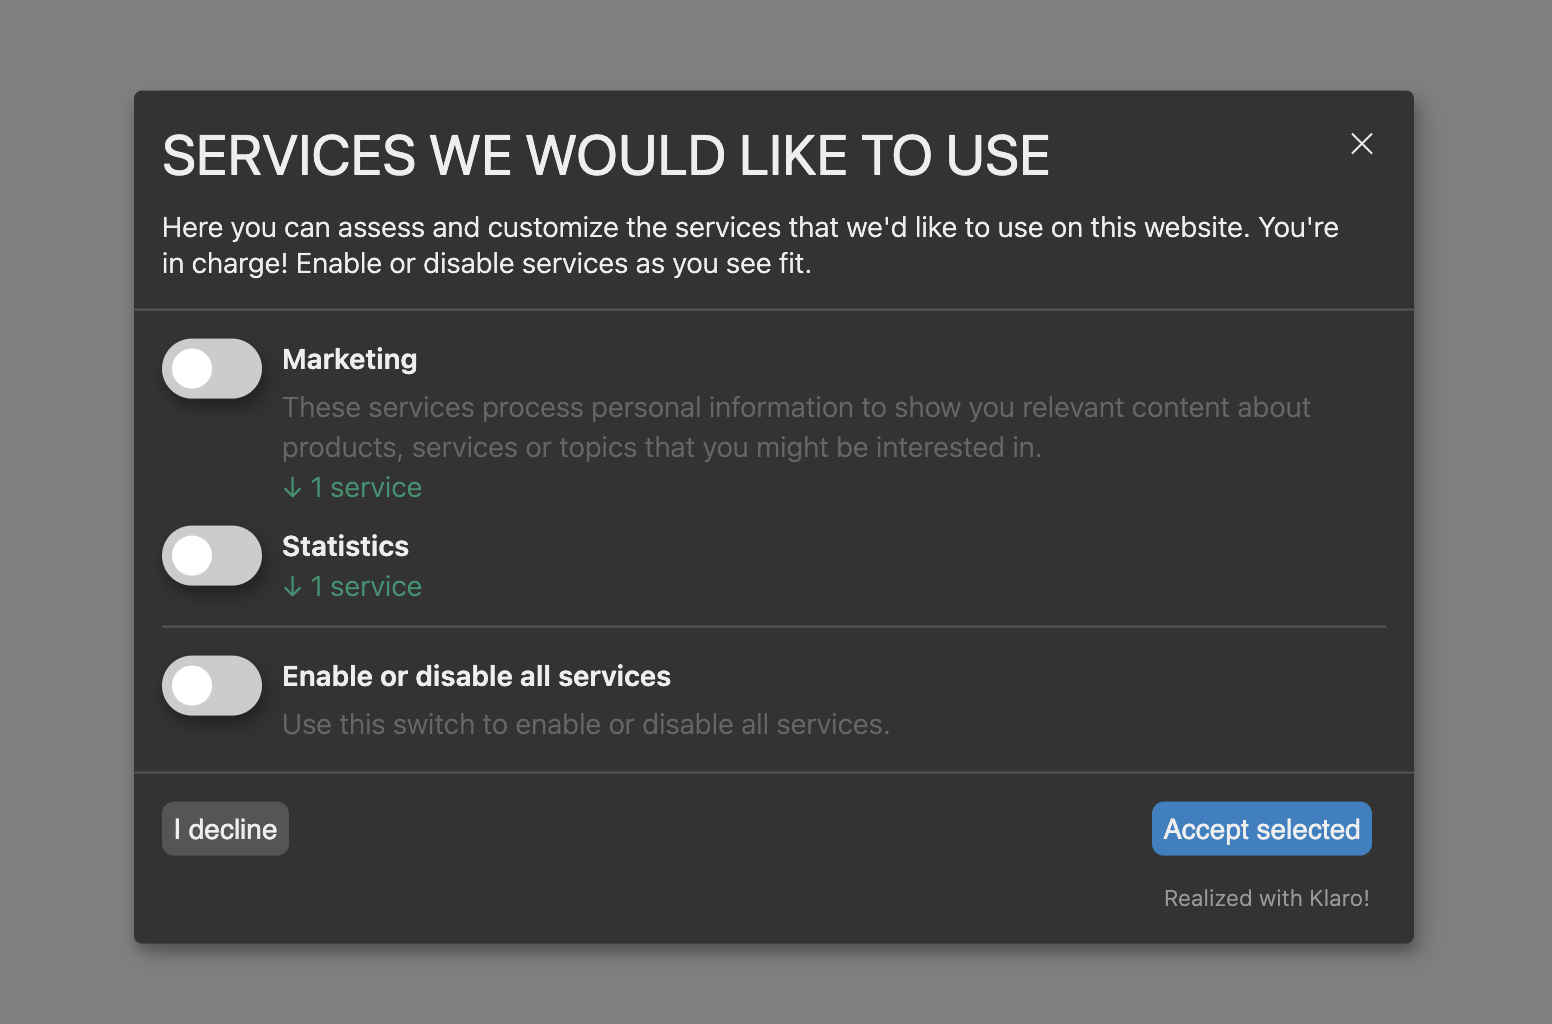
And here is what will be seen when clicking on the "Let me choose..." link:
This is the basic out-of-the box configuration. But Klaro also includes the ability to offer much more complex and detailed consent options, as well as different language translations, and custom CSS. You can view their full documentation here →
Configuration
- Web store configuration
- Google Tag Manager configuration
- Testing the configuration
- Advanced customization
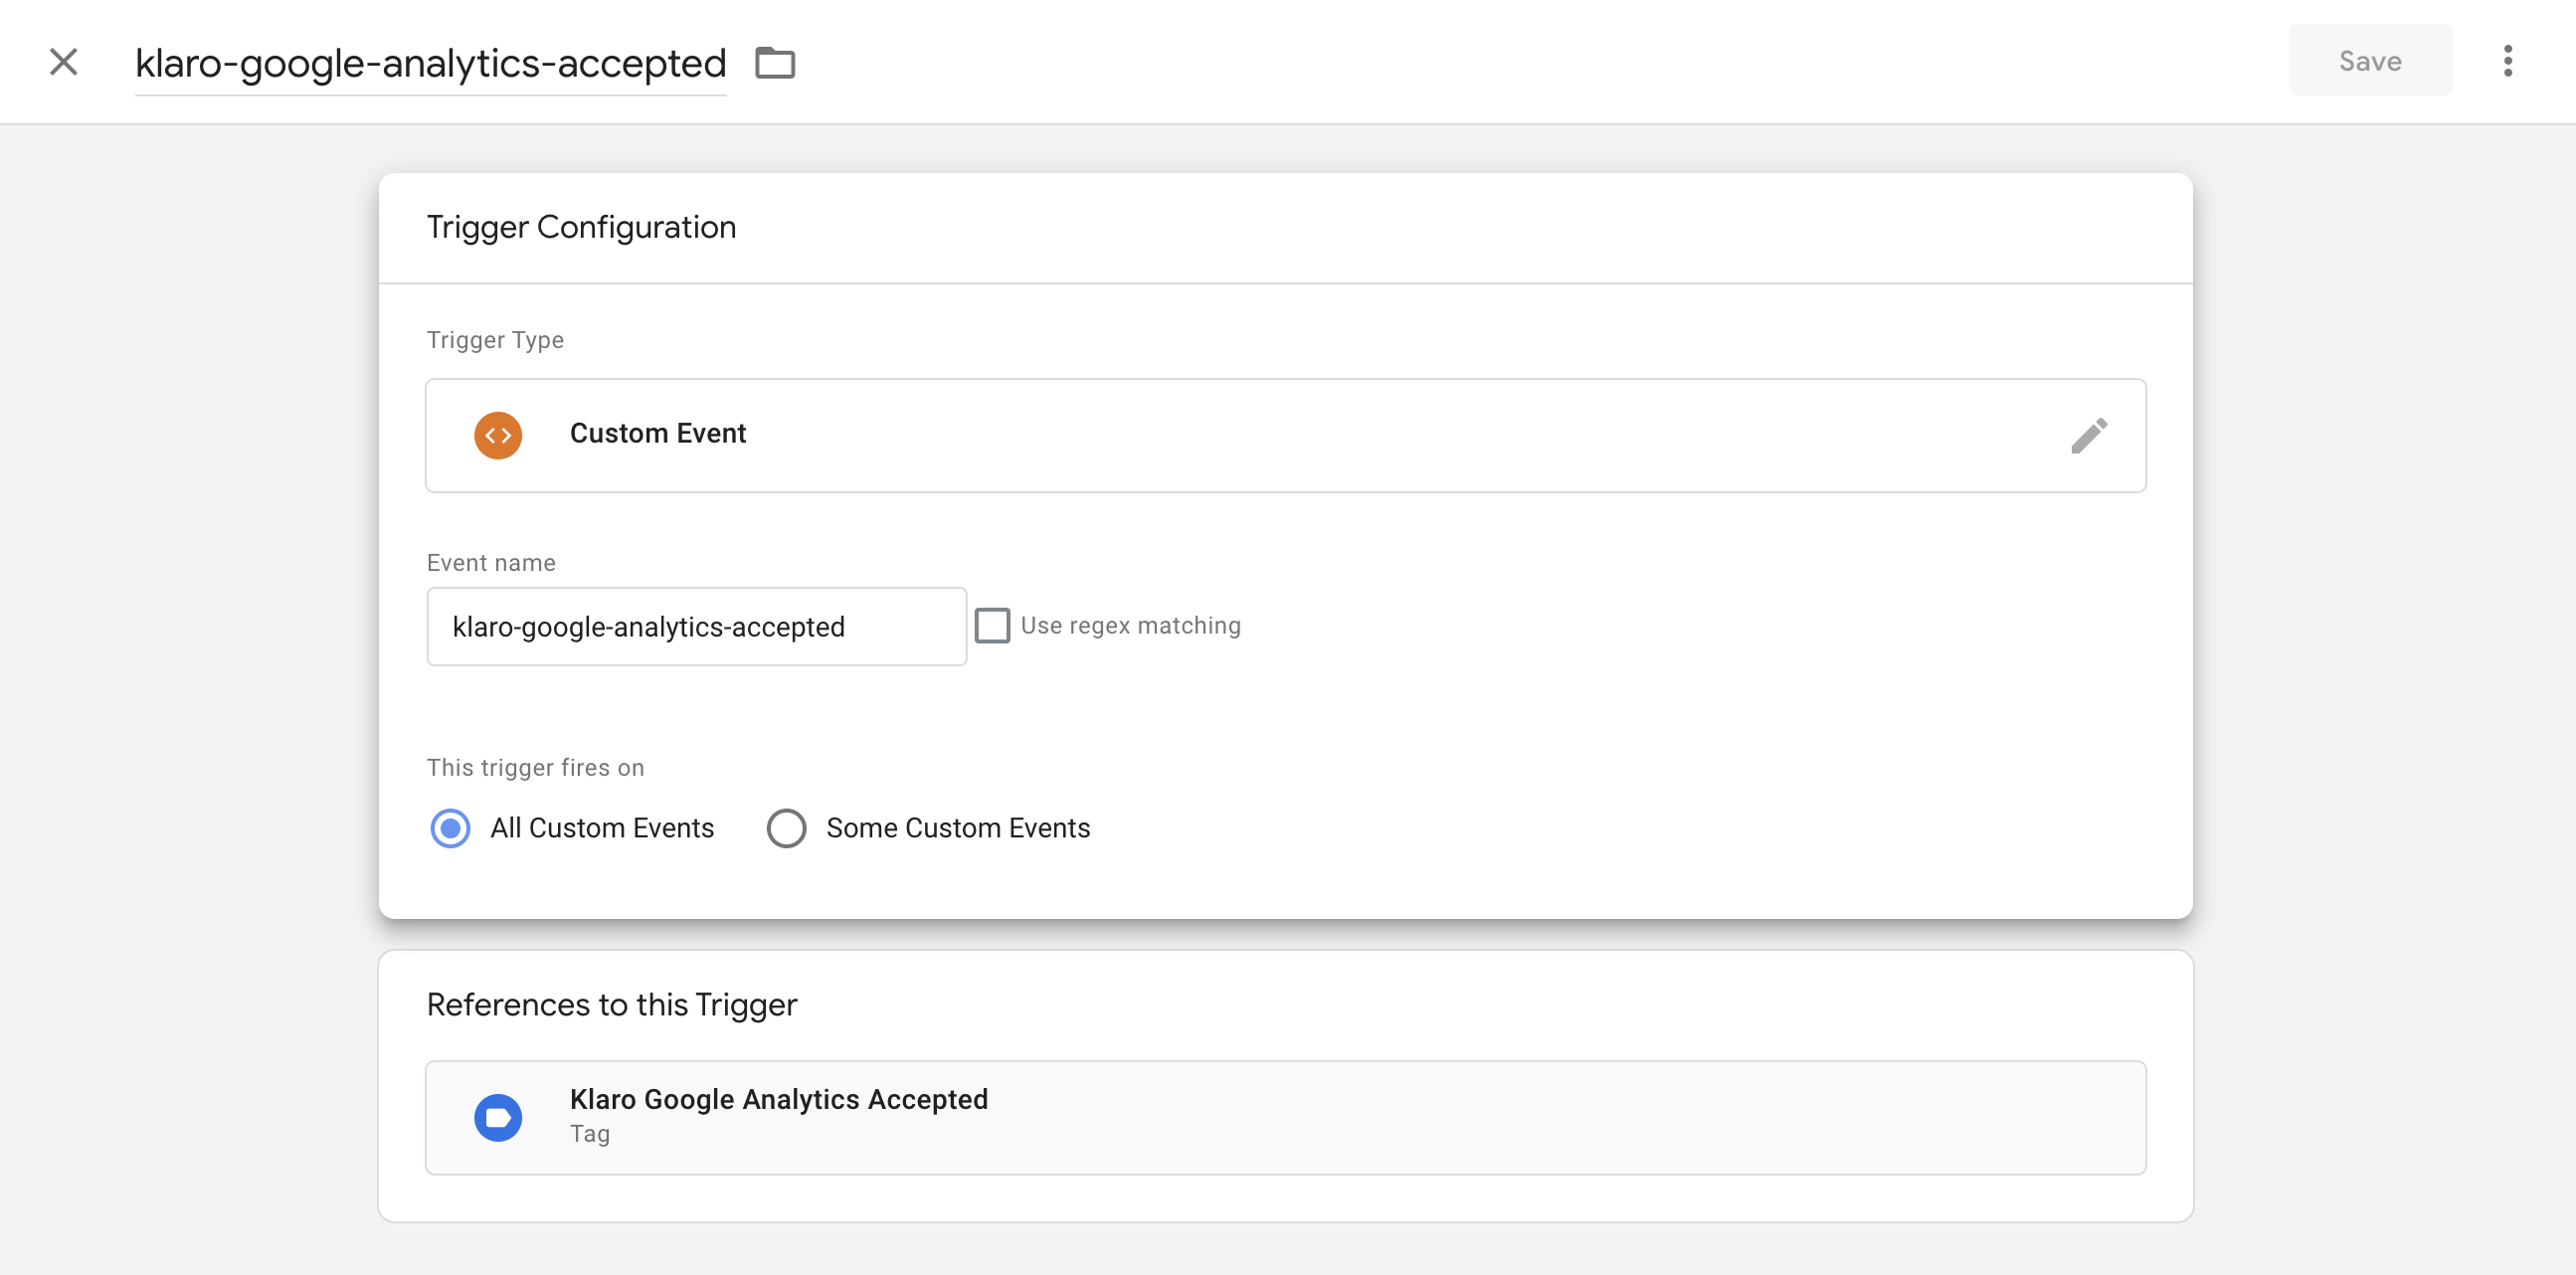
Web store configuration
From the admin area of your web store, navigate to "System → Modules → Custom Tags → New". We will be creating three new custom tags.
In the first tag, set it to Position: Head - directly before </head> and Page Type: All. Enter the following:
<script type="text/javascript" src="https://cdn.kiprotect.com/klaro/v0.7.2/klaro.js"></script>
<link rel="stylesheet" href="https://cdn.kiprotect.com/klaro/v0.7.2/klaro.min.css">
For the second tag, set it to
Position: Head - directly before </head>
and
Page Type: All
and enter the following code. This is your "config" for Klaro. To start out, we are creating consent toggles for both Google Analytics and Google Tag Manager.
<script>
var klaroConfig = {
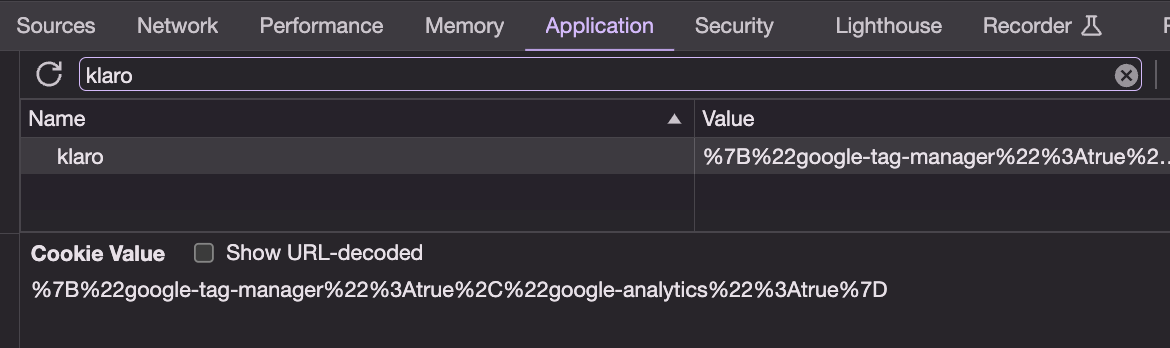
storageMethod: 'cookie',
cookieName: 'klaro',
default: false, // Block by default
services: [
{
name: 'google-tag-manager',
purposes: ['marketing'],
onAccept: `
// Notify Google Tag Manager about accepted services
for (let k of Object.keys(opts.consents)) {
if (opts.consents[k]) {
let eventName = 'klaro-' + k + '-accepted';
dataLayer.push({ 'event': eventName });
}
}
`,
onDecline: `
// Notify Google Tag Manager about declined services
for (let k of Object.keys(opts.consents)) {
if (!opts.consents[k]) {
let eventName = 'klaro-' + k + '-declined';
dataLayer.push({ 'event': eventName });
}
}
`,
},
{
name: 'google-analytics',
purposes: ['statistics'],
cookies: [/^ga/i],
onAccept: `
console.log("Google Analytics usage was granted");
gtag('consent', 'update', {'analytics_storage': 'granted'});
`,
onDecline: `
console.log("Google Analytics usage was denied");
gtag('consent', 'update', {'analytics_storage': 'denied'});
`,
}
],
apps: [
{
name: 'google-analytics',
default: true,
title: 'Google Analytics',
purposes: ['statistics'],
cookies: [/^ga/i]
},
{
name: 'google-tag-manager',
default: true,
title: 'Google Tag Manager',
purposes: ['marketing'],
cookies: [/^ga/i]
}
]
};
klaro.setup(klaroConfig);
</script>
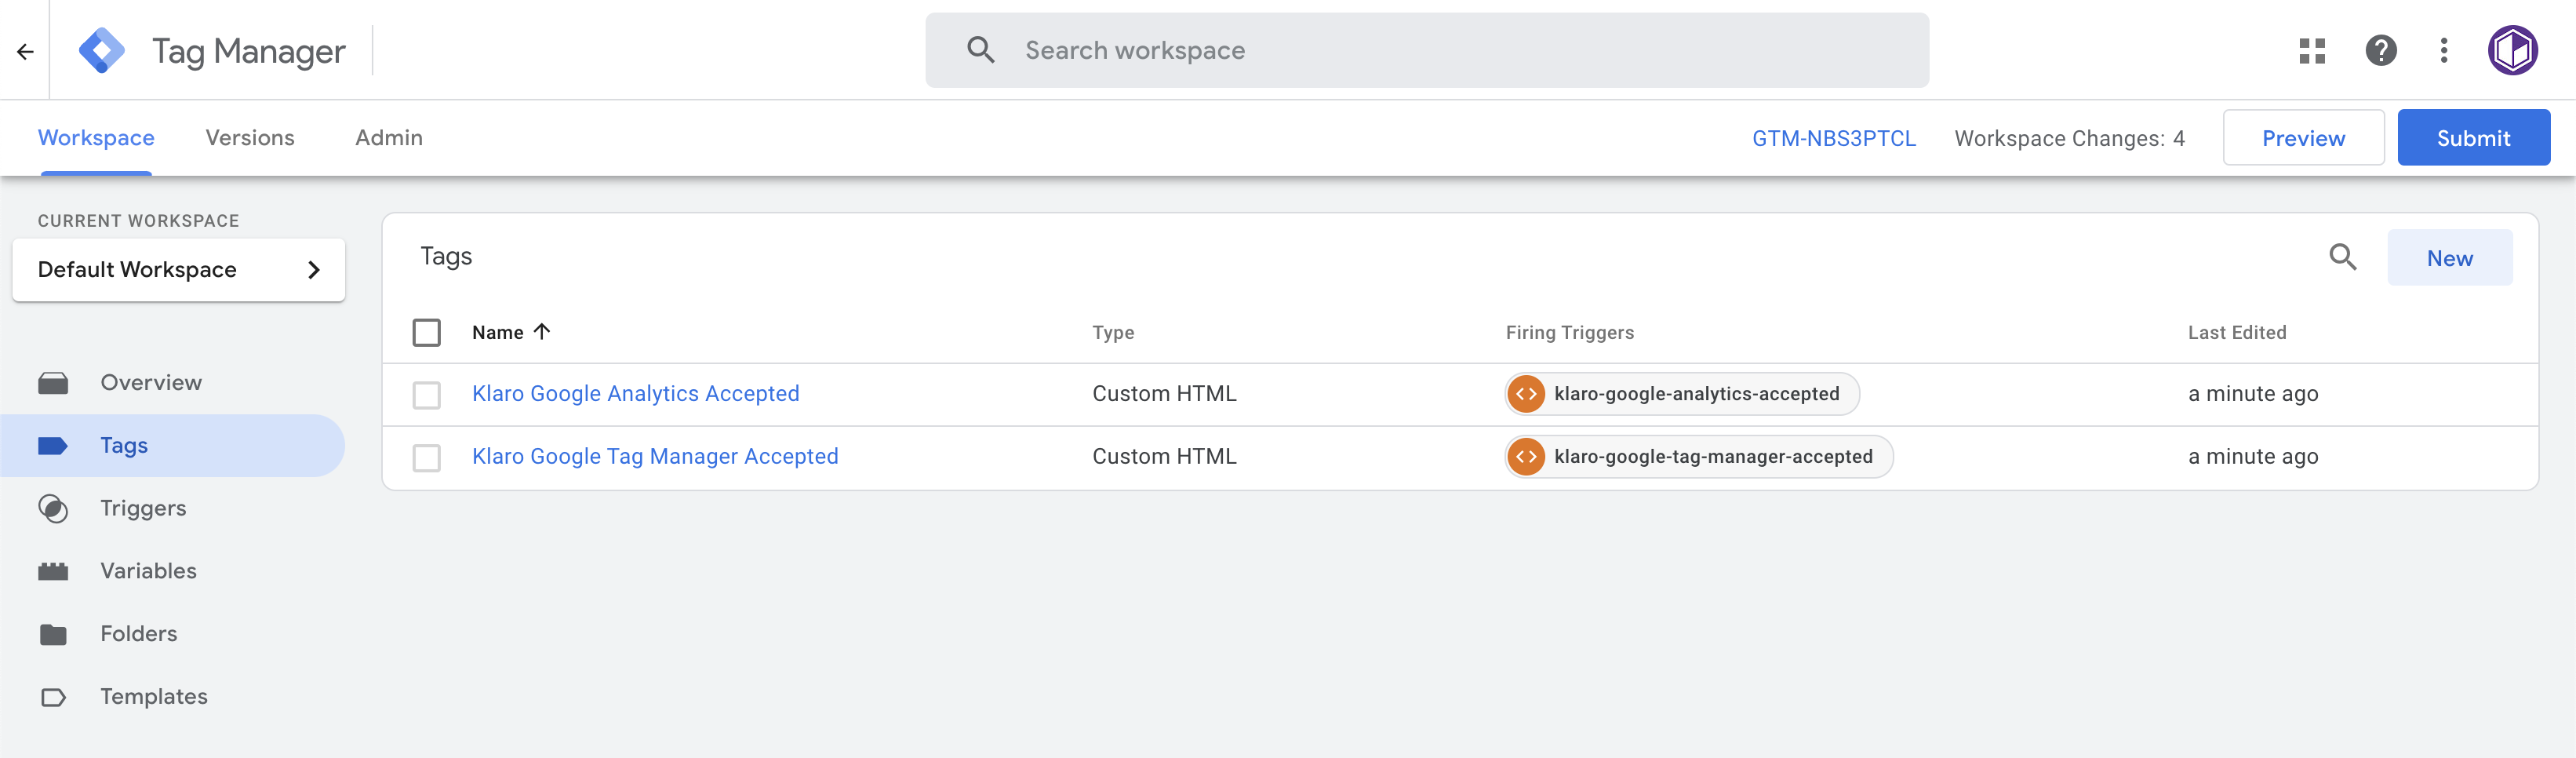
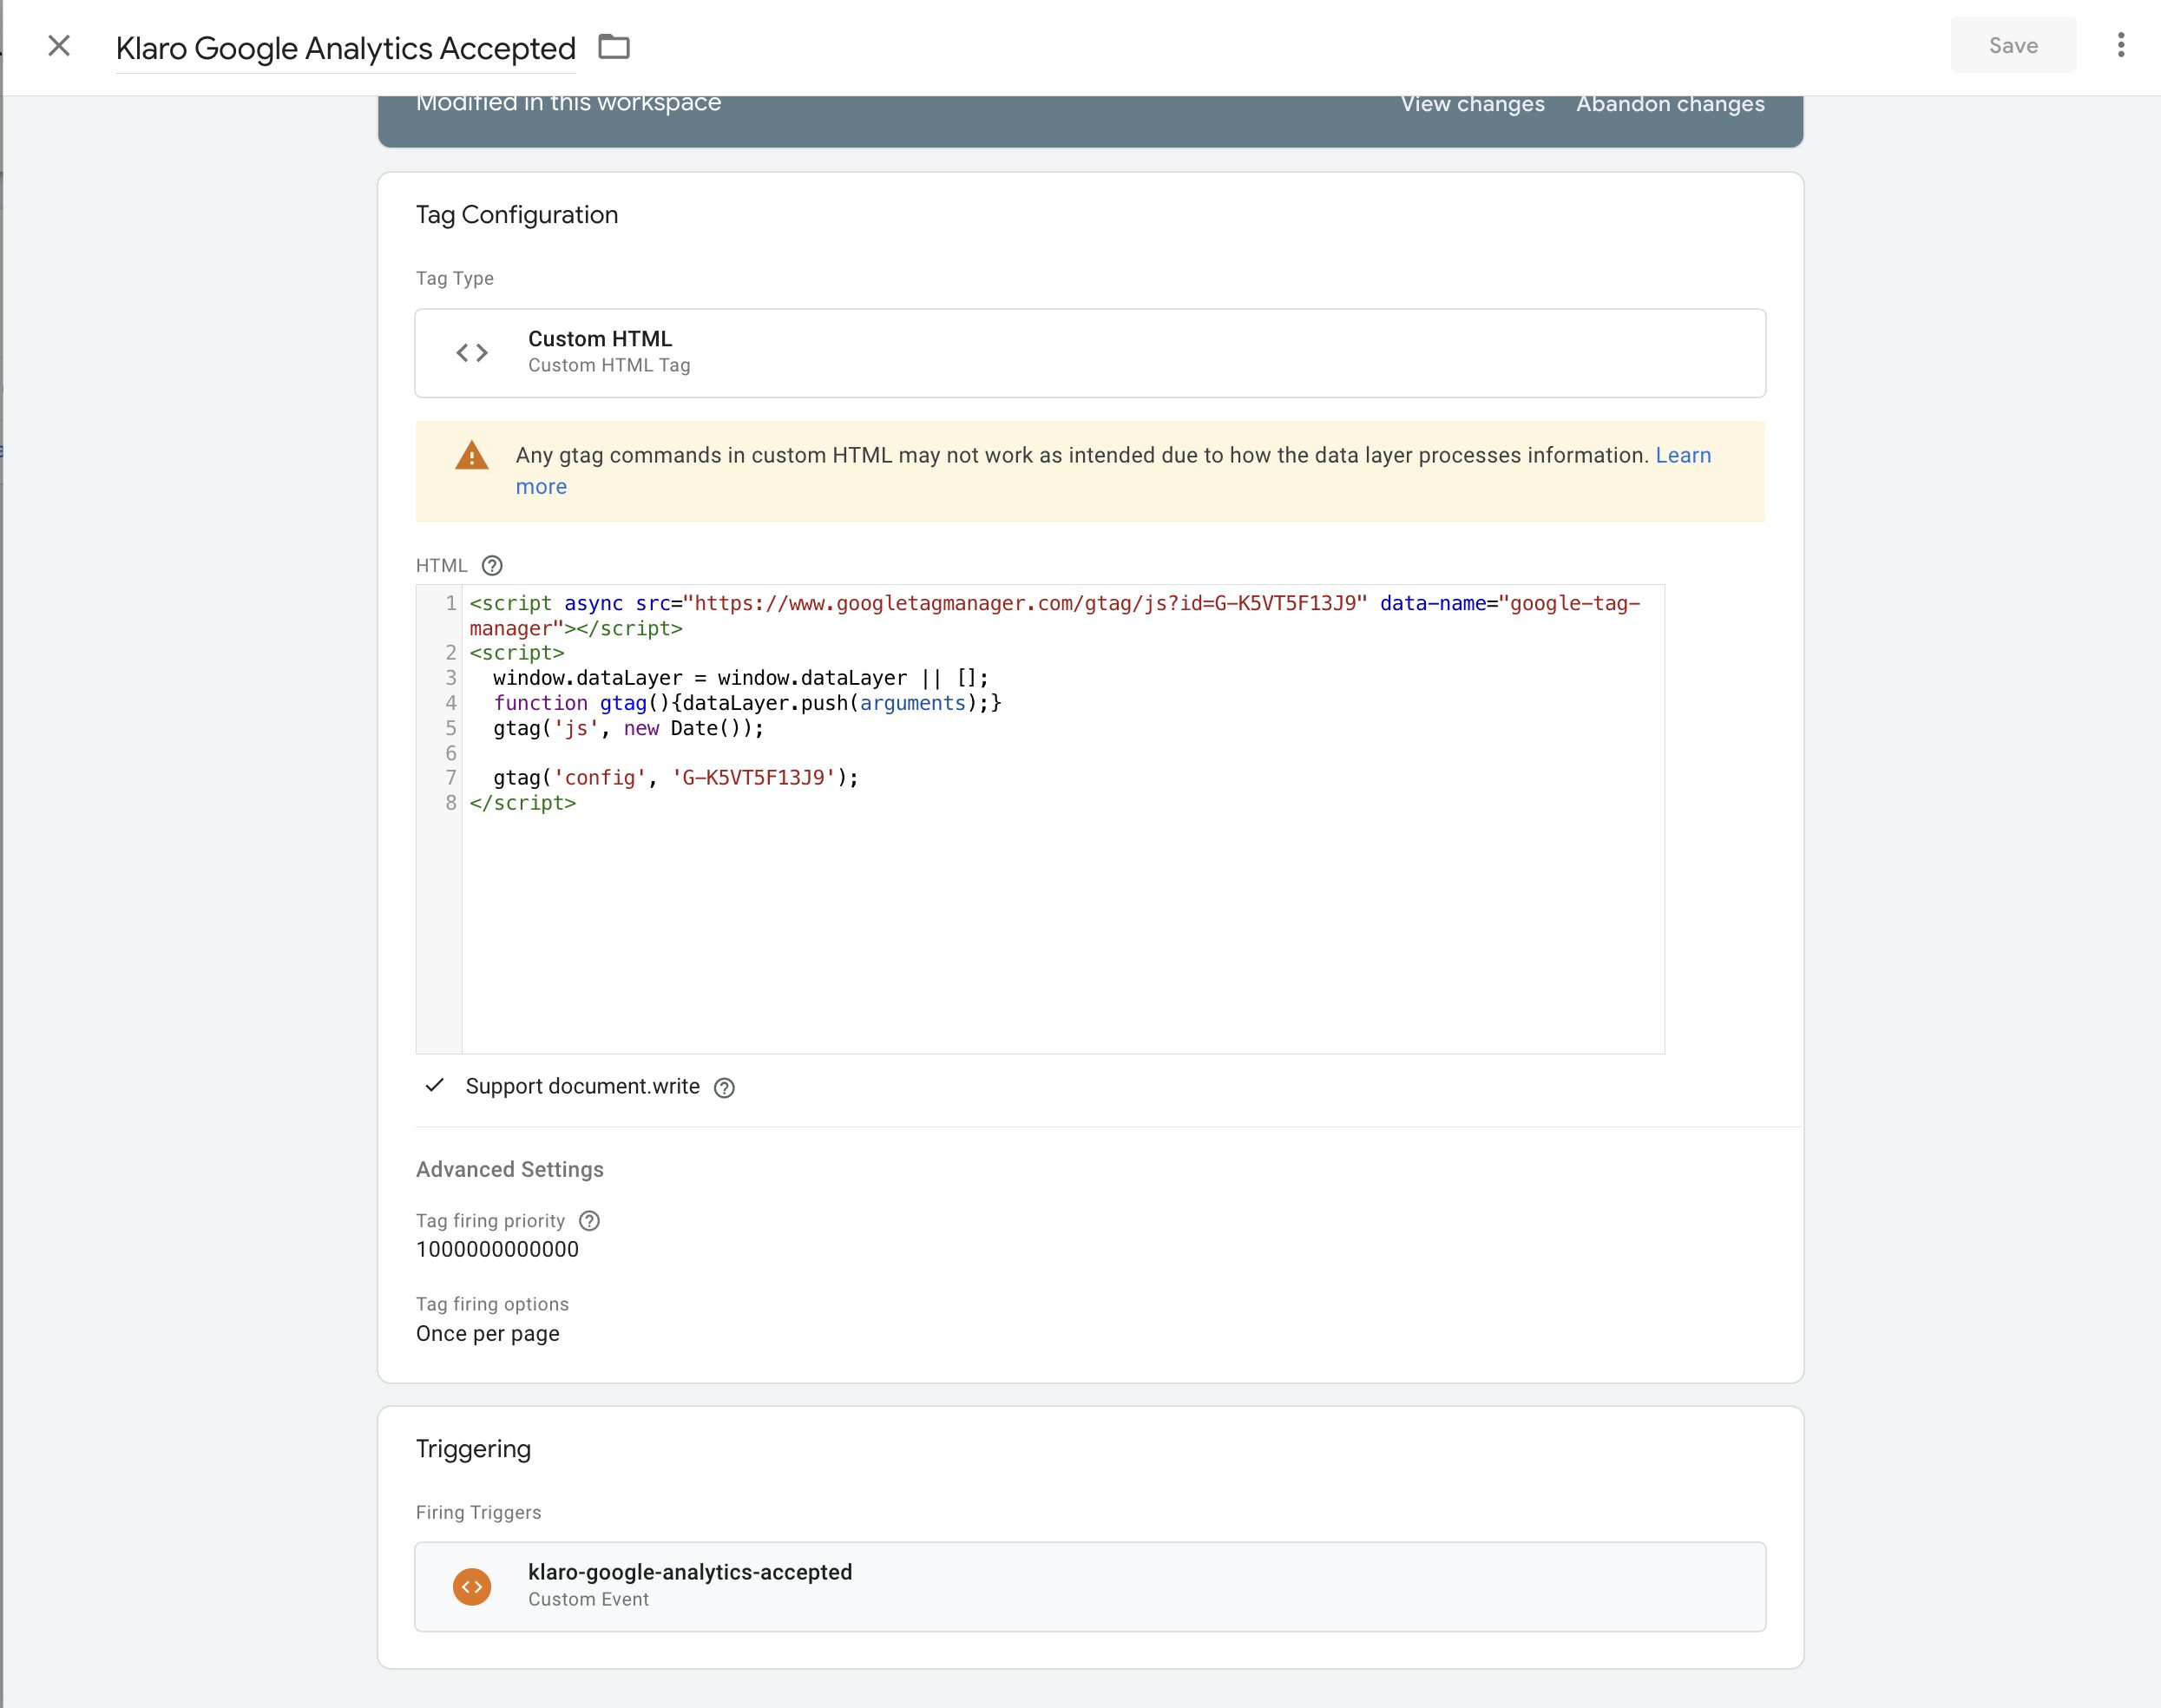
Finally, set your third tag to Position: Footer - directly after </body> and before </html> and Page Type: All. Enter the following code:
<script>
function checkKlaroCookie() {
if (document.cookie.split(';').some((item) => item.trim().startsWith('klaro='))) {
var klaroConfig = JSON.parse(decodeURIComponent(getCookie('klaro')));
if (klaroConfig['google-analytics'] === true) {
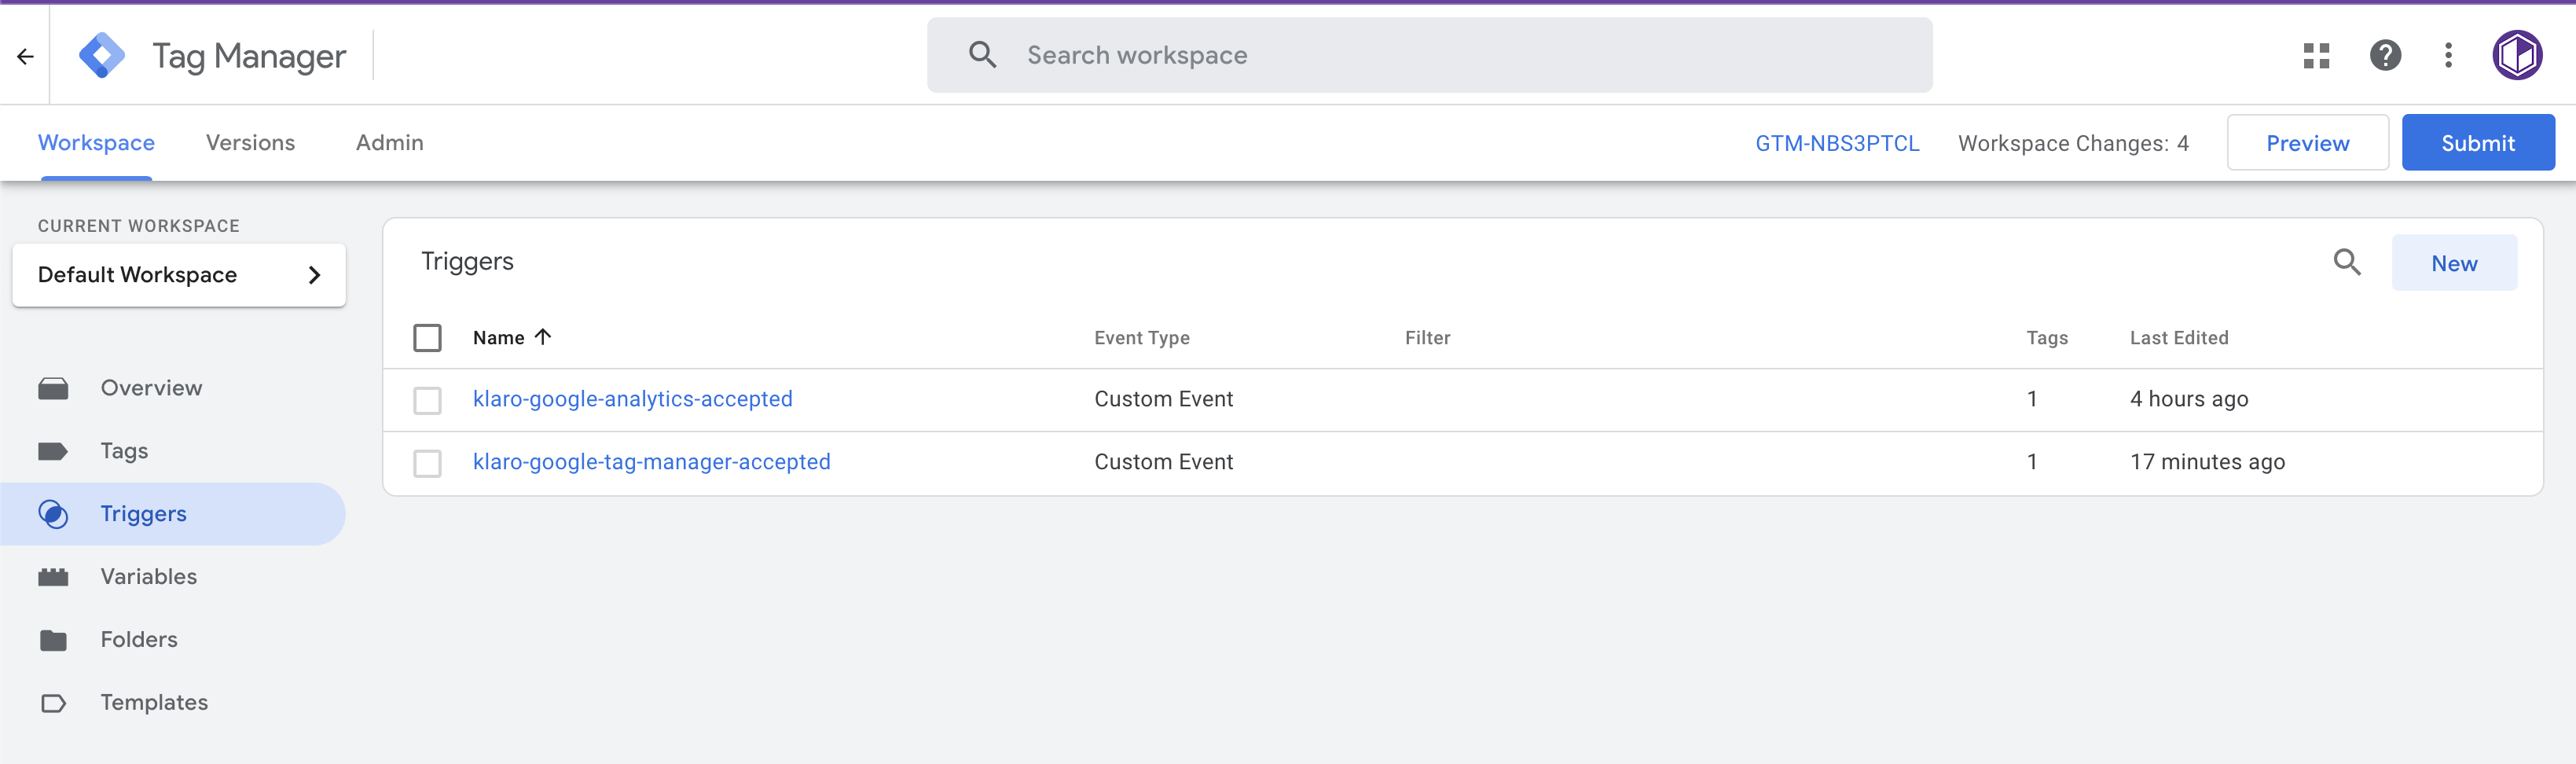
dataLayer.push({ 'event': 'klaro-google-analytics-accepted' });
}
if (klaroConfig['google-tag-manager'] === true) {
dataLayer.push({ 'event': 'klaro-google-tag-manager-accepted' });
}
}
}
function getCookie(name) {
var cookieValue = "";
var cookies = document.cookie.split(';');
for (var i = 0; i < cookies.length; i++) { var cookie = cookies[i].trim(); if (cookie.substring(0, name.length + 1) === (name + '=')) { cookieValue = decodeURIComponent(cookie.substring(name.length + 1)); break; } } return cookieValue; } $(document).ready(function() { checkKlaroCookie(); }); </script>
Existing Google Analytics Code
Next you need to review your site for existing code for Google Analytics. You want to be sure to remove any that is found, leaving only data for Google Tag Manager. It's possible that code for Google Analytics was saved to "System → Modules → Custom Tags" so do a quick search on that page to confirm that none is present.
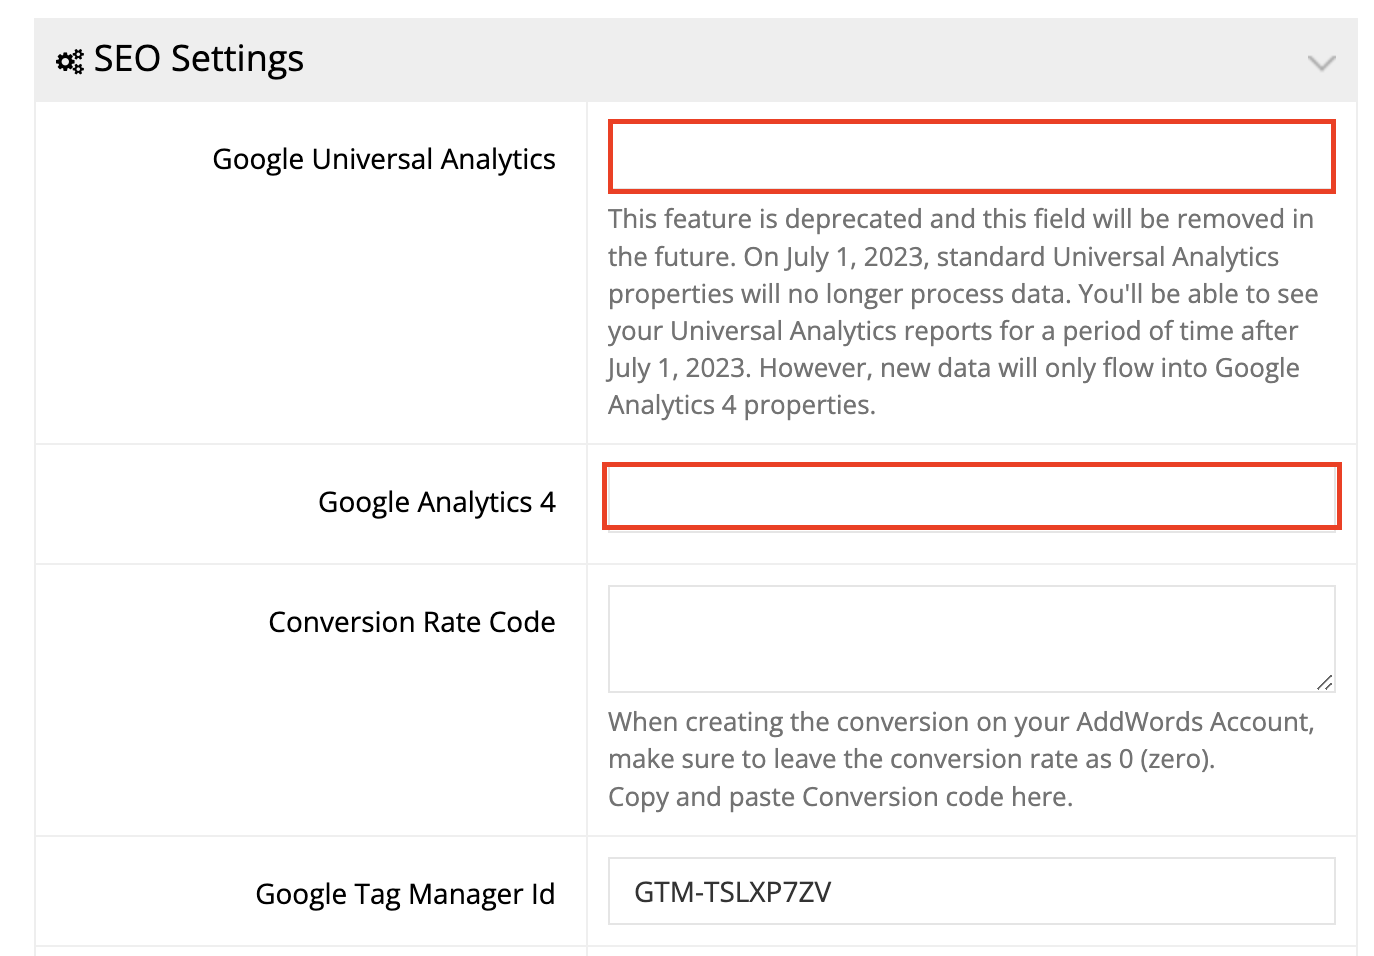
Next navigate to "System → Site Settings" and ensure that the fields for "Google Universal Analytics" and "Google Analytics 4" are empty.
The web store is now configured, and if you view the frontend of your website you should see the cookie consent box loading in the bottom right of your screen.
Advanced customization
- Adding more services/options
- Reopen the consent module after closing
- Update the text on the consent block
- Providing different translations
Adding more services/options
To add addtional items for users to accept, alongside Google Analyics and Google Tag Manager, you can add those to the "services" section of your config JavaScript. It will look similar to the following:
services: [
    {
        name: 'intercom',
        title: 'Intercom',
        default: true,
        purposes: ['livechat'],
    },
    {
        name: 'mouseflow',
        title: 'Mouseflow',
        purposes: ['analytics'],
    },
    {
        name: 'adsense',
        purposes: ['advertising'],
    },
    {
        name: 'cloudflare',
        title: 'Cloudflare',
        purposes: ['security'],
    },
    {
        name: 'google-tag-manager',
        purposes: [
            // (remaining config details here)
        ]
    }
]
Note that whatever "purpose" you assign your item, it will appear beneath the toggle for that grouping.
Reopen the consent module after closing
A link can be created somewhere on your page that can trigger reopening of the consent module like so:
<a onclick=" klaro.show(undefined, true);return false;">
Manage your consents
</a>
Update the text on the initial consent block
Here is an example of how the text can be updated. More options can be viewed here →
translations: {
en: {
  consentNotice: {
    description:
    'Our website uses cookies and similar technologies for a number of purposes, including to improve your experience on the website.',
    },
  decline: 'I Decline',
  ok: 'I Accept',
},
},
Providing different translations
You can add different translations of the module window by adding the following to your config, just before "services:"
translations: {
    de: {
        privacyPolicyUrl: 'https://YOUR-PRIVACY-POLICY-URL.com',
        consentModal: {
            description: 'Hier können Sie einsehen und anpassen, welche Information wir über Sie sammeln. Einträge die als "Beispiel" gekennzeichnet sind dienen lediglich zu Demonstrationszwecken und werden nicht wirklich verwendet.',
        },
        inlineTracker: {
            description: 'Beispiel für ein Inline-Tracking Skript',
        },
        externalTracker: {
            description: 'Beispiel für ein externes Tracking Skript',
        },
        adsense: {
            description: 'Anzeigen von Werbeanzeigen (Beispiel)',
            title: 'Google AdSense Werbezeugs',
        },
        matomo: {
            description: 'Sammeln von Besucherstatistiken',
        },
        camera: {
            description: 'Eine Überwachungskamera (nur ein Beispiel zu IMG-Tags)',
        },
        cloudflare: {
            description: 'Schutz gegen DDoS-Angriffe',
        },
        intercom: {
            description: 'Chat Widget & Sammeln von Besucherstatistiken (nur ein Beispiel)',
        },
        mouseflow: {
            description: 'Echtzeit-Benutzeranalyse (nur ein Beispiel)',
        },
        googleFonts: {
            description: 'Web-Schriftarten von Google gehostet',
        },
        purposes: {
            analytics: 'Besucher-Statistiken',
            security: 'Sicherheit',
            livechat: 'Live Chat',
            advertising: 'Anzeigen von Werbung',
            styling: 'Styling',
        },
    },
    en: {
        privacyPolicyUrl: 'https://YOUR-PRIVACY-POLICY-URL.com',
        consentModal: {
            title: 'Custom Title',
            description: 'Here is a custom description to be displayed for English users.',
        },
        adsense: {
            description: 'Displaying of advertisements (just an example)',
            title: 'Google Adsense Advertisement',
        },
        cloudflare: {
            description: 'Protection against DDoS attacks',
        },
        intercom: {
            description: 'Chat widget & collecting of visitor statistics (just an example)',
        },
        mouseflow: {
            description: 'Real-Time user analytics (just an example)',
        },
        googleFonts: {
            description: 'Web fonts hosted by Google',
        },
        purposes: {
            analytics: 'Analytics',
            security: 'Security',
            livechat: 'Livechat',
            advertising: 'Advertising',
            styling: 'Styling',
        },
    }
}
Please note that you can also set a custom privacy policy URL from this location as well, under "privacyPolicyUrl".
More Options
You can review all configuration options for Klaro on their Github page or their documentation.